
In this DIY guide you will learn about how to easily fit an integrated loft hatch and ladder into a ceiling in your home. You will also learn about the different types of loft hatch and ladder and the different types of ceilings and construction and what issues these can present.
We never have enough storage in our homes for items that we tend to use regularly let alone those that are only used once in a while such as Christmas decorations and suitcases.
In most homes items such as these find their home in the loft when not in use along with any other similar items but when they’re needed, if you don’t have decent access into your loft it can be a potentially dangerous task balancing on ladders and trying to squeeze through the hatch.
With this in mind, this DIY how-to guide focuses on how to install a good quality timber loft hatch and ladder that will make accessing your loft both easy and safe.
There is essentially 2 different types of loft ladder, the all-in-one timber hatch and ladder we are looking at in this project and the probably more familiar aluminium loft ladder.
When someone mentions the words “loft ladder” this is probably the first image that jumps into your head. This is mostly due to the fact that the aluminium loft ladder is probably the most common type of loft ladder installed in homes in the UK. One of the major reasons for this is that they are pretty cheap, around £45, and can be easily retrofitted to most existing loft hatches.
One of the best features about the aluminium loft ladder is that pretty much all are 3-section extendable ladders which means that they compact down to a fairly small size which in turn means that they can fold up into even small loft hatches.
Despite the very beneficial upsides there are a few downsides, the first being that as the ladder folds up into the loft space in most cases to get it down so that you can get into the loft you need a ladder to actually get the loft ladder down.
The other issue is with the rungs. As they are fairly thin and made of metal, standing on them for even short amounts of time can be very uncomfortable!
Despite these issues, aluminium loft ladders do offer a cost effective and straightforward means fo accessing your loft.
Aluminium loft ladder
The timber loft ladder and hatch is the top of the pile option when it comes to accessing your loft but unlike the aluminium ladder mentioned above, timbers ladders aren’t as cheap, normally coming in around the £100 – £130 mark.
Unfortunately the expense doesn’t stop there as unlike the aluminium ladder that can be fairly quickly and easily installed, the timber ladder does require some work to install it, namely a tradesman. However if you fancy having a go then everything you need to know is detailed below.
On the flip side to the above, timber hatches and ladders also have some distinct advantages in that they are much more sturdy and solid than their aluminium counterparts, the rungs are much wider and infinitely more comfortable to stand on and the hatch openings are much wider than most existing hatches meaning getting things in and out of your loft is much easier.
To cover all potential install requirements and locations, timber hatches and ladders are available in a great many different sizes and specifications, some even being fire rated.

Integrated timber 3 section loft ladder
One very important point to be aware of when looking to purchase a loft ladder is to first measure the height of your ceilings!
In most cases your ceiling should be somewhere around the 2.4m – 2.55m in height. The majority of the off-the-shelf loft ladders will be able to accommodate this height no problem. However if your ceilings are higher than this then you may need a bespoke ladder made especially for you.
For some further tips and information on all the different types of loft ladders available including all they’re different variations see this handy brochure on teh Fakro website.
If your property is was constructed prior to the 1930’s there is a chance that your walls and ceilings could have been constructed using lath and plaster. Lath and plaster was traditionally used to provide the finishing cover to walls and ceilings before it was replaced by the cheaper and less labour intensive plasterboard.

As lath and plaster coverings are generally pretty fragile, when enlarging your loft hatch and you get to the point where you have to then cut out the excess plaster laths to enlarge the hole, this often results in large sections of the ceiling crumbling and falling down and a hefty bill to repair the damage.
Lath and plaster ceiling viewed from loft space
To avoid this potential issue we have found a couple of different ways, the first is to construct an architrave frame the same size and your new hatch opening around the outside of the new opening that is securely screwed up to the ceiling joists and then use a pad saw to cut the required hole. This way when you then cut out the unwanted lath and plaster the architrave holds and protects the rest of the ceiling and avoids any damage.
The second method is to securely screw one or 2 loft boards or a large piece of ply board over your proposed hatch location and then you can use a reciprocating saw, jigsaw or similar to cut down from above without disturbing the lath and plaster and damaging it.

Although power tools are infinitely quicker than using hand tools, the levels of vibration they give off can easily shake and damage the lath and plaster.
Cutting lath and plaster using a reciprocating saw
There are several different ways to fit a folding timber loft ladder and the best method to use will depend on where it’s going to go and who has manufactured it.
In most cases you will probably want to replace your existing loft hatch with your brand new timber ladder and hatch, but in some cases as in our example here you may want to move your loft hatch to a new and more easily accessible location.
In this example the customer who we are installing the loft ladder and hatch for wanted it installed over the landing as opposed to replace the existing hatch which was in one of the bedrooms.
The first job is to settle on exactly where your new hatch is going to be installed. As mentioned above this may be a brand new location or it may be in place of the existing loft access.
If you are relocating and creating a brand new access as we are here then there are some points that need checking and confirming.
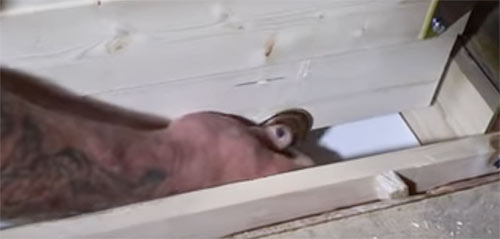
The first thing to check is exactly where the hatch will fall e.g. where it will be on the ceiling so firstly from on your landing or floor where the hatch will be positioned, insert a 4 inch screw through the ceiling and then go back into the loft and locate the screw (first check with a pipe, stud and cable detector to ensure you don’t drill through any existing pipes or electrical cables).

To find it locate the rough area where it should be and remove any loft insulation or boards that may be covering it.
Removing loft insulation to locate position screw
Once you have found it check that there will be enough space to install your hatch and ladder. The majority of ceiling joists are spaced and 300mm or 600mm centres so your hatch should be slightly smaller than 600mm to fit between them. The hatch we are using here is 550mm in width which will drop nicely between the joists and leave us a nice 20mm wiggle gap around the outside.
Once you have checked that the hatch will fit in your proposed install location the next job is to check the area on your landing or floor to ensure that when the ladder is folded out it drops down onto the floor with plenty of space around it so that you can actually climb on to it to access the loft.
The space required for this will vary depending on the type and size of ladder you have and who manufactured it. Some manufacturers ensure that when the ladder is deployed it falls within the confines of the actual hatch, however others have the ladder fall outside of the hatch perimeter.
Within the instructions that come with your ladder the manufacturer will state exactly what space is required around your ladder to ensure that it can be extended correctly and safely so please adhere to these guidelines.
In most cases allowing 450mm in front of the ladder/hatch and 50mm behind the hatch will ensure the ladder can extend correctly and the hatch can fully open as required.
One you have settled on your chosen install location the next job is to enlarge your existing loft hatch (if needed) so that your new hatch and ladder can be fitted.
Essentially this involves supporting the existing ceiling joists and ceiling using some timbers then the ceiling and joists are cut away and once removed, doubled up timbers are screwed across the cut timbers to support them.

Be sure to allow your 20 – 25mm gap around your new hatch for wiggle room for your hatch as this has to go in absolutely square to ensure the hatch lid and ladder can open and close correctly and squarely to the frame.
Cutting away ceiling using a pad saw for new loft hatch and ladder
When installing your loft hatch from above and indeed below the job is made much easier if you have some solid and level support so that you can rest the hatch in the hole while you adjust it and screw it in place. Trying to hold one end with one hand and the other supporting it with you neck is just inviting and accident or at the very least a wonky hatch.
One of the most straight forward solutions to this issue is to construct a simple prop using 3 or 4 x 2 timbers. Cut one timber so that it is roughly 100mm longer than the length of the hatch opening and the other to the height of your ceiling minus the depth of the timber you’re using e.g. 2 inches and screw the shorter section centrally to the longer section.
Once fixed together position them upright with the shorter section spanning the hatch gap. If it’s slightly loose use some packers to pad it out so it’s a tight fit.

Once in place you can then rest the hatch in the hole securely while you adjust it and fix it in exactly the right place.
Prop across loft hatch opening to support new hatch while it’s fixed in place

With the prop securely in place, drop the new hatch into the hole and wiggle until it’s central to the hole. Check the perimeter and ensure that the adjustment gap is uniform all the way around the loft hatch.
Position the loft hatch in the new hole and adjust

Once adjusted use packers and also timbers cut to the precise wiggle room gap, fit them in place all around the gap between the hatch and the hole so that the hatch is held firmly in place central to the hole. It can take a little time to get it precisely right.
Fit packers in place to hold hatch central in loft hatch hole
Once the hatch is secured in place it now needs to be screwed up. Using 6 screws along the length and 3 screws along the width, evenly space each screw along each dimension and secure the hatch firmly in place in the hole. Try to keep all the screws inline and uniform so that all is neat.

Be very aware when you screw each screw up not to pull the frame out of shape or bow it as this will affect how the hatch lid closes and how the ladder extends and sits on the floor.
Screwing loft hatch in place in new hole
Once the hatch is fully secured in place the next task is to fix the ladder to the hatch. For information on how to do this see the instructions that came with your ladder kit.
All ladders are fixed slightly differently depending on who manufactured them.
In the majority of cases, first the ladder section will need securing to the hatch. This is normally done by screwing the loft ladder to the brackets on the hatch.
Secure loft ladder to loft hatch
Next will normally be the 2 side bracing struts that tie the hatch to the frame and then finally the springs than enable the soft opening and closing of the hatch.

As you insert each fixing tighten it finger tight by hand at this stage but once all is in place and you can then remove the prop and open the hatch and extend the ladder, remember to go back over all the fixings and tighten them fully.
Tighten all fixings by hand and then retighten once the hatch and ladder are open
The majority of ladders will come to suit a ceiling up to the height of 2.8m but if your ceiling is 2.4m then for the ladder to sit at the correct angle some will need trimming off the bottom.
Once the struts are in place and the hatch is open, the struts will hold the hatch and ladder at the correct angle that it needs for the ladder to sit on the floor at the correct angle. If the ladder is presently too long then once extended it won’t allow the hatch and struts to fully open and extend, so if this is the case it will need trimming.
To work out how much needs to be trimmed off simply open your hatch and extend out each section of your ladder except the last section.

Using a tape measure hold the end on the underside of the first string, side of the ladder, (you may need someone to hold the end of the tape for you) of the section on the hatch and allow the tape to follow the trajectory of the string of each section until it hits floor level.
Follow the string trajectory to calculate ladder height and what needs trimming off

Next, open out the final section of the ladder and mark the measurement you arrived at above on the underside of the ladder on both sides. Once marked cut each side of the string off square. Your ladder should now touch the floor when the hatch and struts are fully opened.
Cutting ladder to length so it opens correctly
In most cases, certainly with 2 and 3 section ladders you will get plastic feet to fit over the end of the ladder. Once fitted the will allow the base of the ladder to sit square with the floor.

However in some cases you won’t get feet. If this is the case use a sliding bevel (learn how to use a sliding bevel in our project here) to measure the angle of one of the steps when the ladder is at it’s correct angle (as you did above) and then when you make your cut to shorten the ladder, described above, cut the end of each string to the angle set by your bevel. This will then create the feet in place of the plastic ones.
Feet fitted to base of ladder

One of the final jobs to do now is to fit the latch mechanism that came with your kit. To work out where the latch stay or keep needs to go, simply close the hatch up and where it sits level in the frame position the keep down until it touches the hatch. Mark each fixing hole and then screw the keep to the frame.
Fitting the latch stay to the loft hatch frame

Next, fix the latch mechanism is then screwed to the top of loft hatch lid using, in most cases, the pre-drilled screw holes. If not, position the latch on the lid so that it is engaged with the stay on the frame, mark the fixing holes and then screw it in place.
Fix loft hatch latch to lid

Finally on the underside of the lid screw the hook eye into the latch. This will allow you to open the loft hatch lid using a special pole from floor level without the need to climb up and use a ladder!
Fix loft hatch latch eye in place in lid catch
The final job now is to repair the gap around the hatch from the underside and neaten it up. To do this simply cut and fix some architrave over the gap and fix it to the edge of the new loft hatch frame so that it fully covers the gap.
For a full and detailed guide on how to accurately mitre cut architrave see our project here and how to cut mitre angles.

Finally use some filler to cover over the screw or nail heads and then also run some decorators caulk around either edge of the architrave to fully seal it up and prevent any gaps and potential draughts. Once the filler and caulk has fully cured you can then paint everything.
Architrave fixed to cover gap around loft hatch frame
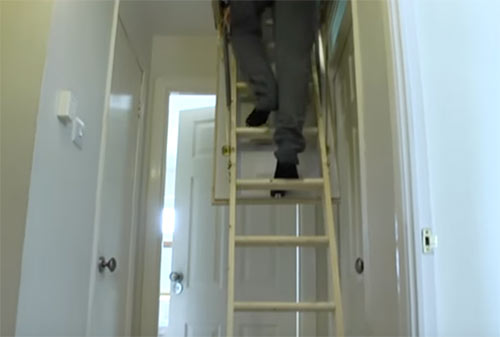
The very last job to do now is open up your new loft hatch and test everything works as it should do, job done!
Testing newly installed loft ladder and hatch
Fitting a decent quality loft ladder and large hatch can make accessing you loft area for storage a much easier and if you take your time and follow the instructions above it’s certainly a job you can do yourself.
All project content written and produced by Mike Edwards , founder of DIY Doctor and industry expert in building technology.